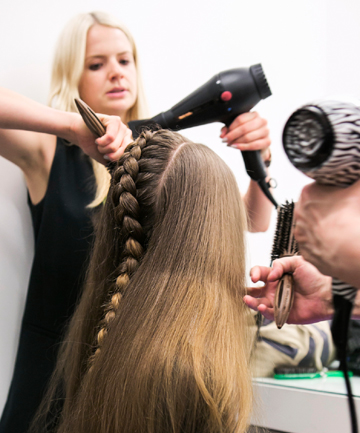
Getting a professional blow-dry is like getting a shot of beauty adrenaline. The feeling you experience when you leave the salon is pure exhilaration. Nothing much has changed; your face is the same, and your weight is the same, but somehow you feel ten times more beautiful and infinitely more confident.
The bummer is that splurging on a pro blow-dry every week is hardly practical and (sigh) doing it yourself never yields the same results — until now, that is.
Determined to unlock the secrets of the salon blow-out once and for all, we went to Mari Ring, senior stylist at the Maximus Salon in Hermosa Beach, Calif., who had to admit that her industry cohorts might be a tad peeved that she spilled some trade secrets.
So, what are you waiting for? Muster some confidence and learn to become the master of your own blow out. It will take practice, but in time, you'll never need to spend 40 bucks on a gorgeous 'do again.
Image via Imaxtree
Photo 2/9
Choose the Right Blow-Dryer
In order to achieve a salon-quality blow-out, you'll need to add certain tools to your arsenal.
Blow-dryer: There are so many to choose from, it can make your head spin. And while we like the Harry Josh Pro Tools Pro Dryer 2000, $300, here are the basic criteria for choosing a quality dryer no matter what your budget.
Wattage: The higher the number, the more powerful the heat and airflow will be. "You need to get at least 1800 watts to prevent frizz," says Ring. "And, if your hair's super thick, you may want to go as high as 2000."
Weight: Some dryers can be heavy and cause your arm to tire before your hair's dry. Ring recommends using one that weighs less than 2 lbs.
Variable Speeds/Heat Control: It's important to be able to control the amount and temperature of the airflow. And having a "cool shot" button comes in handy to help "lock" hair into place.
Attachments: If you're going to blow-dry your hair straight, you definitely want a nozzle attachment.
Ceramic/Tourmaline Technology: This is not just hype. Ceramic heaters emit stronger heat, helping to get your hair straighter, faster, and the negative ion-emitting crystals in tourmaline promote shine and smoothness.
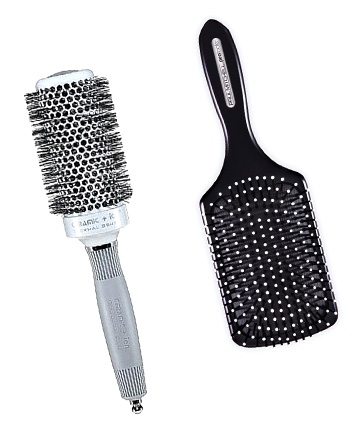
Photo 3/9
Brush Shape Matters
The shape of brush you choose will play a major part in the end result. "If you're going for volume and curl," says Ring, "it is best to use a round brush with a barrel anywhere from 1 ¾ to 2 ½ inches depending on the size of the curl you're after." For a round brush, try Olivia Garden Ceramic + Ion Thermal Hairbrush, $19.95, for a 1 ¾" brush, or Olivia Garden Ceramic + Ion Thermal Boar Bristle Hairbrush, $22.45, for a 2 ½" brush.
If a straight, sleek look is what you're after, it's all about the paddle brush. "They're fantastic brushes, but you don't need to drop $200 on a Mason Pearson," says Ring. "A Paul Mitchell Paddle Brush, available at salons, will work just fine."
Photo 4/9
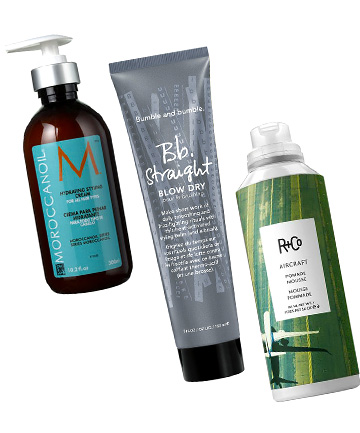
Pre-Dry Prep
You want to either air or towel dry you hair slightly before applying styling products — otherwise they'll slip right off. (Note: Pat hair dry; don't rub it or you'll create frizz.)
If you have curly or wavy hair that you're blowing straight, use a straightening serum or cream like Bumble and Bumble Straight Blow Dry Balm, $29. Shoulder-length hair needs a quarter-sized dollop applied evenly through strands -- adjust amount accordingly by length. As with any styling product, if you have thin or fine hair, never apply to the roots. Instead, focus product from mid-shaft through ends or hair will fall flat.
If volume is what you hair lacks, apply a palm full of root-lift mousse like R+Co Aircraft Pomade Mousse, $29, which contains papaya extract to add volume as well as shine.
After applying product, rough-dry hair at the roots with the blow dryer. Using your fingers only, pull hair away from your scalp and position the dryer so it's shooting air from the crown of your head downward. Continue until hair is no more than 80 percent dry.
Photo 5/9
Divide and Clip
Divide your hair into three sections — top, middle and nape — and clip the sections up.
If you wear bangs, leave them loose, and dry them into place first to set them so they aren't harder to tame at the end.
Getting a professional blow-dry is like getting a shot of beauty adrenaline. The feeling you experience when you leave the salon is pure exhilaration. Nothing much has changed; your face is the same, and your weight is the same, but somehow you feel ten times more beautiful and infinitely more confident.
The bummer is that splurging on a pro blow-dry every week is hardly practical and (sigh) doing it yourself never yields the same results — until now, that is.
Determined to unlock the secrets of the salon blow-out once and for all, we went to Mari Ring, senior stylist at the Maximus Salon in Hermosa Beach, Calif., who had to admit that her industry cohorts might be a tad peeved that she spilled some trade secrets.
So, what are you waiting for? Muster some confidence and learn to become the master of your own blow out. It will take practice, but in time, you'll never need to spend 40 bucks on a gorgeous 'do again.