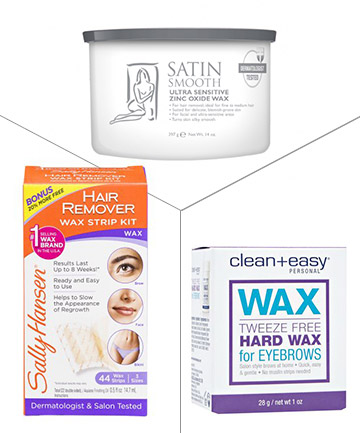
Not all waxes are created equal, and choosing the right at-home product is especially important when it's going on your face. Van Jones recommends Satin Smooth Ultra Sensitive Zinc Oxide Wax, $10.95, a gentle formula that won't stick to skin. If you're super, super sensitive, hard waxes are even gentler, though the one drawback is that they may not remove hair completely, she adds. One to try: Clean + Easy Tweeze Free Eyebrow Hard Wax, $5. And if you're worried about burning yourself (a valid concern, BTW, since burns are one of the most common injuries that come from DIY waxing), pre-waxed, self-heating strips are a great option, since they can never get super hot. Try Sally Hansen Hair Remover Wax Strip Kit for Face, $6. Above all, be sure to choose a formula made for the face, since waxes for the body are too strong, cautions Van Jones.
Photo 4/9
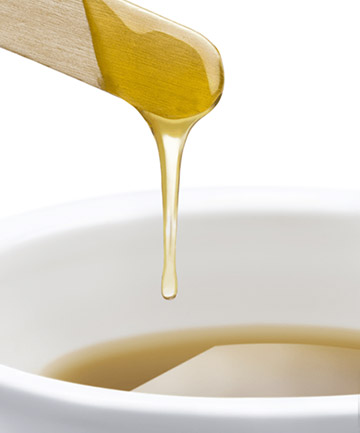
Prep Wax Correctly
Van Jones advises using wax that can be heated in boiling water or investing in a wax pot. Our pick: Gigi Space Saver Wax Warmer, $26. If you are going to use microwavable wax, proceed with extreme caution; the wax may look hard, but as soon as you stir it, it can explode and burn the you-know-what out of your skin, warns Van Jones. Use the consistency of the wax as a temperature indicator: "It should be the thickness of peanut butter or honey. Once it becomes too liquid-y and looks more like oil, it's way too hot," she points out. Test a small amount on your wrist before applying onto your money-maker.
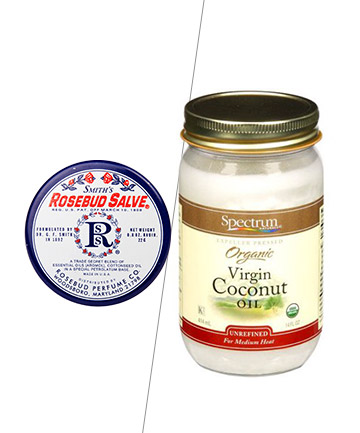
Since you want the wax to adhere only to the brow hairs, and not to skin (major ouch), it's a good idea to create a protective barrier. Crooks advising using coconut oil, while Van Jones uses Smith's Rosebud Salve, $6. Regardless of what you pick, apply a dab onto a makeup sponge and swipe around the perimeter of each eyebrow.
Photo 6/9
Work in Sections
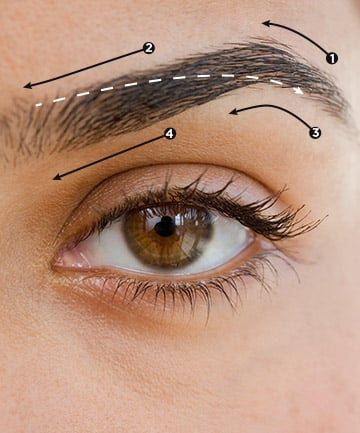
Crooks suggests waxing your eyebrows in sections, rather than in one fell swoop. "This makes for easier application, more precise hair removal, and ultimately, better results," she points out. Van Jones likes to do the top of the tail, then the top of the bridge (from the start to the arch). After doing those two spots on one brow, repeat on the other side to make sure both brows look the same so far. Finish by waxing underneath the tail and the bridge, then do one last pass in between brows (aka the unibrow). One caveat: If you're a waxing newbie -- or just aren't that hairy -- you can skip waxing above the brow and just clean up the bottom, which is where most of the growth occurs, says Crooks.
Image via Getty
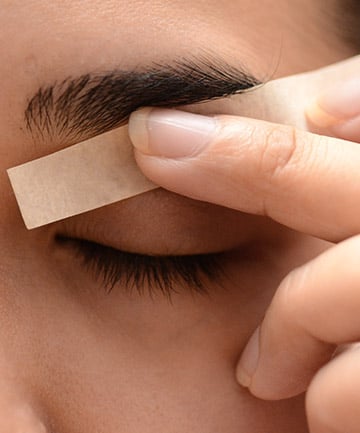
Photo 7/9
Wax On, Wax Off
As is the case with most things in life, less is more. "If you apply too much wax, it will start to glob up. Once you apply the strip, it can get pushed too far into the brow, removing hair that you don't want to take off," notes Crooks.
Rather than use the typical popsicle-style stick, Van Jones recommends a smaller orange stick for more precise application. Make sure strips are small; cut them into one-quarter-inch by three-inch pieces if they're too large.
Smear the wax on in the direction of the hair, then smooth a strip over it. Hold skin tautly with one hand and remove the strip with the other. Pull it off parallel to the face (as if you were going to fold the strip back over itself), not straight out, in the opposite direction of hair growth, advises Van Jones.