Lesson No. 7: Stop applying eyeliner the wrong way
Finally, we're onto the technique that landed me in makeup school in the first place. Eyeliner has always been hit or miss for me and now I know why.
I've been doing it all wrong.
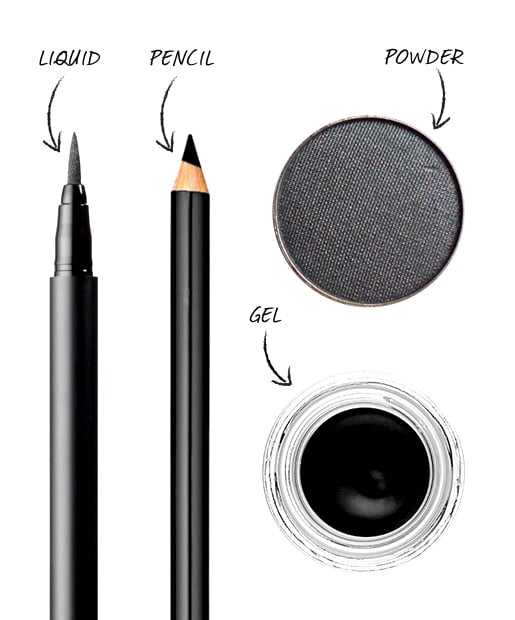
In Chapter 7 of the Make-up Designory textbook, I learned that you're actually not supposed to draw your liner all the way across your lashline in one motion. "You'll get bumps in your line with your brush catching on loose skin," says Prior. Instead, you're supposed to go from the inner corner to the center of your lid, then reload the brush (if you're using one) and start from the outside corner until you meet the existing liner.
And as for my wonky winged tips? Prior gave me a smart tip to make sure a wing is always in the right place. "Napoleon Perdis always starts with eyeliner on the lower lashline, because it goes up at the outer corner, which gives you the angle that you should follow on your top lashline," says Prior. "Usually when you do your top liner first you end up in no-man's-land, because you don't know how far to take the line or how curved it should be."
Photo 9/11
Lesson No. 8: Get Angelina Jolie's lips without injections
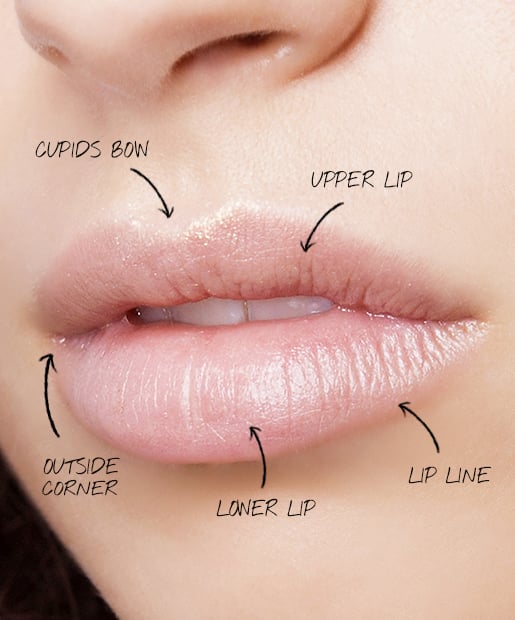
Before makeup school, I had no idea there was an ideal lip shape. Apparently, your lips are most balanced when the upper and lower lips are equal in size, or thickness, says Prior. If they're not, you can use your knowledge of highlights and shadows to re-contour them.
Step 1: Apply foundation to your entire lip, says Napoleon Perdis. Not only does this help remove the natural pigments of your lips for truer lipstick colors, but it can also help you realize where your liplines actually are. Step 2: Using a white eyeliner pencil, very softly feather the pencil over the natural contour of the lip. Or use the pencil to make lips fuller or thinner by drawing it past your natural lipline or within it. Step 3: Redo the line with a lip pencil in the color of your lipstick. Step 4: Apply lipstick with a lip brush in a downward motion. So, from your cupid's bow to each outer corner, then from your outer corner to the center of your lower lip. This ensures an even application of the product, says Hawker. Step 5: Apply a light shade of base foundation around the new lip line, blending to a soft edge with a lip brush.
Remember, light colors reflect light, so using lighter lip colors will give a fuller appearance. Dark colors absorb light, so they will make lips look smaller/thinner. Finally, try this popular trick used on Victoria's Secret Angels to give the illusion of a fuller pout: Apply a dab of gloss to the top part of your Cupid's bow and to the center of the bottom of your lip.
Image via Imaxtree
Photo 10/11
Lesson No. 9: Make fake brow hairs look real
I've heard this a million times: Your inner brow should line up with your eye's inner corner, your brow's arch should be above the outer edge of your iris, yadda yadda yadda. I honestly zoned out during most of the brow lesson, but then we got to the good stuff:
Stewart says the biggest mistake women make with brows is choosing a color that's too dark. Dark brows can make you look older, she says, so pick a color that's a couple shades lighter than your hair.
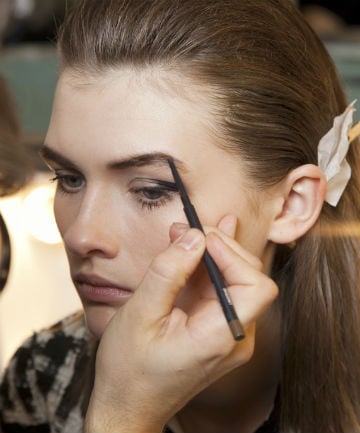
If you're using a pencil: For a realistic look, apply more pressure at the bottom of the stroke where the root would be. Ease off on the pressure as you flick your stroke upward, using small strokes to make it most look like hair, says Hawker.
If you're using a powder: Brush the powder starting from the outer corner of your brow and work against the direction of your hair growth. This ensures a more natural finish by allowing the brow hair to sit over the powder, so that your brows don't look drawn in, says Prior. Make sure to emphasize the arch with your color, and taper off at the inner corners so you don't look angry.
Image via Imaxtree
Photo 11/11
Lesson No. 10: Know how to conceal those under-eye circles
Since dark circles are such a sore spot for most of us, we took a lot of time mixing just the right blend of orange-tinted concealer with a beige-colored concealer that matched our skin tones. The Napoleon Perdis Paparazzi Makeup To-Go class teaches how to remove under-eye circles with the "Hollywood V." With your concealer brush, swipe the color-correcting concealer under your eye in a "V" shape from your outer to inner corner. Then, buff the concealer into your skin, until you get to the center of your lower lid, where you'll want to feather the concealer for a lighter application.
While it seems like a lot of work, customizing a color-correcting mixture made especially for your skin tone can actually erase stubborn bags instead of highlighting them.
Image via Imaxtree
You could say that I have a love/hate relationship with makeup. Some days I enjoy playing with all the different colors and get excited when my smoky eye turns out perfectly.
But then there are those days when my liner refuses to go on straight, my bronzer makes me look like an Asian Snookie, or my lashes refuse to curl. That's when I want to toss my makeup bag out my bathroom window.
I had one of those days last week, and after walking into work wearing two very different winged tips on my eyes, my editor assigned me a new story: Go to makeup school and write about it.
Even if she was not-so-subtly telling me that I suck at applying my own makeup, I eagerly took the assignment. And I didn't just go to one school — I went to three. I hit up the Napoleon Perdis Academy in Hollywood, Calif., Make-up Designory in Burbank, Calif., and Make Up For Ever Academy in Los Angeles.
Each school has different types of classes, from special effects courses that teach you how to make realistic-looking zombies and vampires, to high fashion-focused programs that show you daring techniques seen on the runway and in magazine spreads. But for my purposes, the makeup 101 courses would suffice.
After spending my mornings learning about color theory and how to (properly) hold a makeup brush, I can say I'm now totally confident in my makeup artistry skills. Want to see the best techniques I picked up without spending the thousands of dollars (and crazy amount of time) it takes to go to makeup school yourself? Keep reading. What you'll find here is what I'm now referring to as The Cliffs' Notes Guide to Being a Pro Makeup Artist.