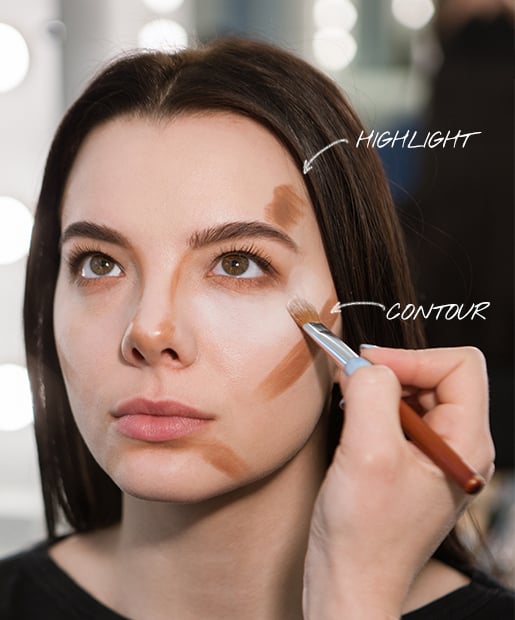
So here's a not-so-secret confession: I hate my face. It's rounder than a Cabbage Patch Kid's and I can't stand my button nose. So when Prior says today's lesson is learning how to contour properly so you can alter your face shape and features, I'm so eager to learn I actually volunteer to be her model at the front of the class. "Contouring is the art of highlighting and shading," says Prior. "Anything that is lighter than the skin tone will make an area more prominent, anything darker will make that area recede." Here's how you can easily alter your face:
If you have a round face and want to make it look more oval: Apply a bronzer a shade or two darker than your skin tone in a "3" shape alongside your face: on your temples, the hollow of your cheeks, and your chin.
If you have a prominent forehead: Shade around the outer edge of your forehead along your hairline to minimize the area with bronzer.
If you have a flat or wide nose: Shade alongside your bridge starting from your inner brows. Then highlight right on the center of your nose.
If gravity is taking a toll and your cheeks are sagging: Apply a highlighter just above your cheekbone all the way to your temple. Use a blush directly on the cheekbone, then use a bronzer in the hollow of the cheek, underneath your bone.
And if you really want to make your contouring stand out, use a sparkly highlighter, which will reflect the most light. Then for your bronzer, go for a matte finish, which will absorb light and create a stark contrast.
Image via igor_kell/Getty
Photo 6/11
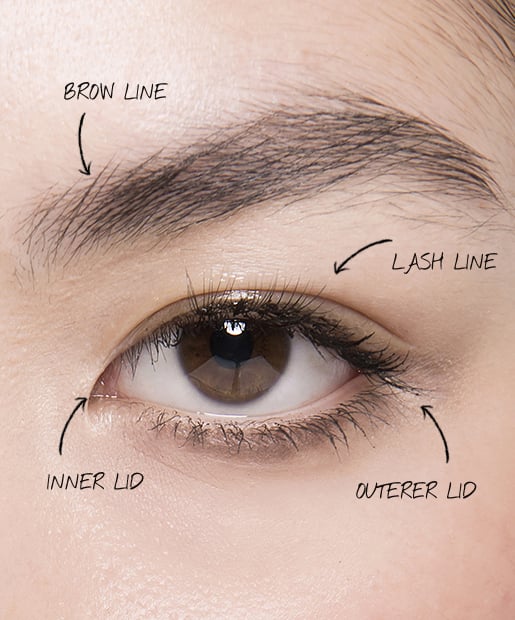
Lesson No. 5: Make your eyes pop by changing their shape
Just like how I learned to use highlights and shadows to contour my face, I found out that I can use the same info to alter my eye shape, too. Whether you have drooping lids, narrow-set eyes, or they're simply too small, you can use your knowledge of light and shadow to change them.
If you want to add definition: Sweep a light bronzer through the crease of the eye, which is halfway between the lashline and the eyebrow. "As you age, the eye area loses elasticity, and things aren't as shapely as they used to be," says Prior. "This technique is great for mature skin, to give the face more definition." A tip for you blue-eyed girls: An orange-y bronzer in your crease will make your eyes even bluer.
If you have narrow-set eyes: To elongate your eye width, apply a black liner to the outer half of both your upper and lower lashlines, connecting at the outer corner.
If you have drooping, heavy lids: Use what you just learned about highlights and shadows to lift your eye. Apply highlighter above your crease, from the inner to outer lid. Then blend a shadow to the area that you want to push back, which would be the heavy fold. Make sure to blend the edges from the shadow to the highlight.
If you have small eyes: Apply a beige-colored eyeliner to your lower inner rim, which will help make eyes look more open. Then use a black pencil liner along your entire upper and lower lashlines, connecting the lines at the outer corner. The key is to blend the liner with shadow, going outwards. Wherever you place the darkness is where your eye will go, so by smudging the lines, it gives the allusion that your eyes are taking up more real estate on your face.
And the tip I love most for natural definition: Apply a black pencil to your upper inner rim. "It lengthens the eye and it also sharpens the appearance of the eye, giving more fullness to the natural lashline without seeing the hard edge of a liner," says Prior.
Image via Imaxtree
Photo 7/11
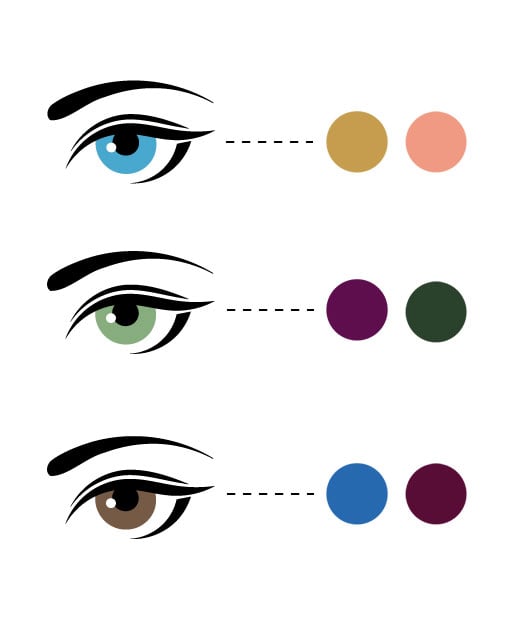
Lesson No. 6: Think opposites when it comes to color
Remember how I learned that opposite colors on top of each other cancel each other out? OK, well today I learned if you place them side by side, they help each other stand out. Simple, but super important when you're trying to pick the most flattering eyeshadow colors. Here's a cheat sheet:
For blue eyes: Since orange is the opposite color of blue, anything with orange in it will make blue eyes stand out more. "It doesn't have to be a blazing sun color — it just has to have orangey undertones like gold, apricot, or peach," says Prior.
For green eyes: Red is the opposite color of green, which isn't to say you should apply a cherry red-colored eyeshadow to your lids. But you'll help your green eyes pop if you use colors that have red undertones, like deep plums and wine.
For brown eyes: Brown is a neutral color, so any color will work well, says Prior. "But the most standout colors are blue and purple."
Photo 8/11
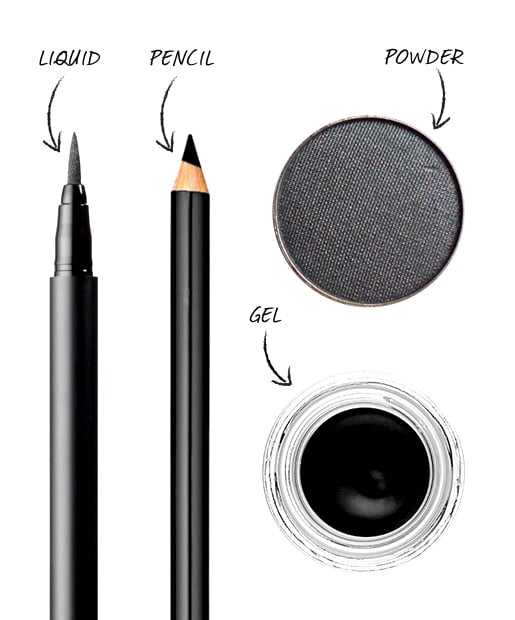
Lesson No. 7: Stop applying eyeliner the wrong way
Finally, we're onto the technique that landed me in makeup school in the first place. Eyeliner has always been hit or miss for me and now I know why.
I've been doing it all wrong.
In Chapter 7 of the Make-up Designory textbook, I learned that you're actually not supposed to draw your liner all the way across your lashline in one motion. "You'll get bumps in your line with your brush catching on loose skin," says Prior. Instead, you're supposed to go from the inner corner to the center of your lid, then reload the brush (if you're using one) and start from the outside corner until you meet the existing liner.
And as for my wonky winged tips? Prior gave me a smart tip to make sure a wing is always in the right place. "Napoleon Perdis always starts with eyeliner on the lower lashline, because it goes up at the outer corner, which gives you the angle that you should follow on your top lashline," says Prior. "Usually when you do your top liner first you end up in no-man's-land, because you don't know how far to take the line or how curved it should be."
Photo 9/11
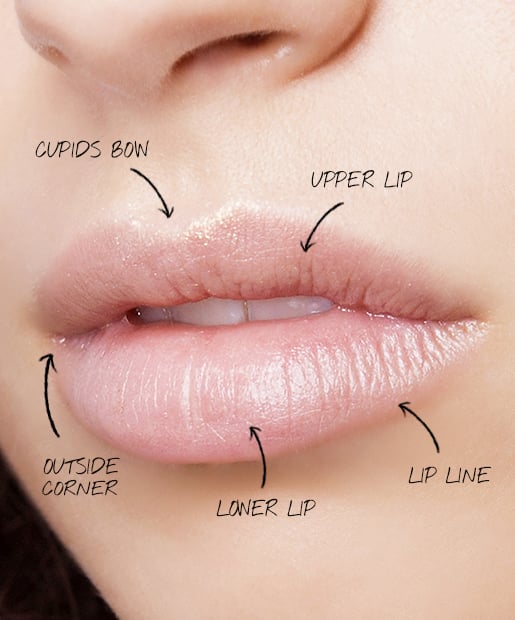
Lesson No. 8: Get Angelina Jolie's lips without injections
Before makeup school, I had no idea there was an ideal lip shape. Apparently, your lips are most balanced when the upper and lower lips are equal in size, or thickness, says Prior. If they're not, you can use your knowledge of highlights and shadows to re-contour them.
Step 1: Apply foundation to your entire lip, says Napoleon Perdis. Not only does this help remove the natural pigments of your lips for truer lipstick colors, but it can also help you realize where your liplines actually are. Step 2: Using a white eyeliner pencil, very softly feather the pencil over the natural contour of the lip. Or use the pencil to make lips fuller or thinner by drawing it past your natural lipline or within it. Step 3: Redo the line with a lip pencil in the color of your lipstick. Step 4: Apply lipstick with a lip brush in a downward motion. So, from your cupid's bow to each outer corner, then from your outer corner to the center of your lower lip. This ensures an even application of the product, says Hawker. Step 5: Apply a light shade of base foundation around the new lip line, blending to a soft edge with a lip brush.
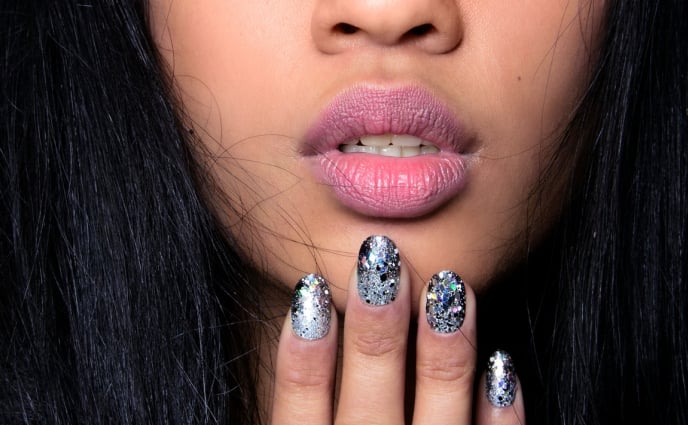
Remember, light colors reflect light, so using lighter lip colors will give a fuller appearance. Dark colors absorb light, so they will make lips look smaller/thinner. Finally, try this popular trick used on Victoria's Secret Angels to give the illusion of a fuller pout: Apply a dab of gloss to the top part of your Cupid's bow and to the center of the bottom of your lip.
Image via Imaxtree
You could say that I have a love/hate relationship with makeup. Some days I enjoy playing with all the different colors and get excited when my smoky eye turns out perfectly.
But then there are those days when my liner refuses to go on straight, my bronzer makes me look like an Asian Snookie, or my lashes refuse to curl. That's when I want to toss my makeup bag out my bathroom window.
I had one of those days last week, and after walking into work wearing two very different winged tips on my eyes, my editor assigned me a new story: Go to makeup school and write about it.
Even if she was not-so-subtly telling me that I suck at applying my own makeup, I eagerly took the assignment. And I didn't just go to one school — I went to three. I hit up the Napoleon Perdis Academy in Hollywood, Calif., Make-up Designory in Burbank, Calif., and Make Up For Ever Academy in Los Angeles.
Each school has different types of classes, from special effects courses that teach you how to make realistic-looking zombies and vampires, to high fashion-focused programs that show you daring techniques seen on the runway and in magazine spreads. But for my purposes, the makeup 101 courses would suffice.
After spending my mornings learning about color theory and how to (properly) hold a makeup brush, I can say I'm now totally confident in my makeup artistry skills. Want to see the best techniques I picked up without spending the thousands of dollars (and crazy amount of time) it takes to go to makeup school yourself? Keep reading. What you'll find here is what I'm now referring to as The Cliffs' Notes Guide to Being a Pro Makeup Artist.